Showing posts with label beverage. Show all posts

Friday, July 12, 2019

Steaming Mug - A Little Different #FakeFoodFriday

Hello All!  This week's #FFFriday is a bit of a stretch to be considered 'fake food,' but it's a project I've been working on for a while and I want to share it!  
We got a note to add 'steam' to a mug that an artist is carrying around to illustrate how very cold it is outside.  She puts this mug to her face and pretends to drink from it as well.  Plus, we're an outdoor theatre, where there's always wind, and it's usually quite warm, so actual hot water wasn't an option.  This project has evolved quite a bit, but I'm going to share my whole process, for science.  (Final tool and materials list will be at the bottom of the post.)

Warning: this post is very long and contains a lot of gifs.


Spoiler: There's no hot liquid in this cup.

Idea 1: Mini Fogger
Well, we didn't have one in stock, and they're pricey.

Idea 2: Dry Ice
Not great since our artist is putting it up to HER FACE.  Also, the fog from dry ice is very dense, so it would have just fallen down the sides of the cup like fog and less like steam.  

Idea 3: a portable atomizer/diffuser
This idea we got some traction on, and it was the first real iteration that went on stage.  I had our shopper pick us up one of these: Portable Essential Oil Atomizer from our local Walmart.


It worked surprisingly well at first! It fit in our mug, it was easy to charge, and only required 'mineral water' in order to work.  The mechanism was simple, you just move the slider down until the mist starts.  


Downsides: it was white (I wrapped it in e-tape), the light was blue & bright (again, e-tape), and the kicker: the vapor shot sideways, not up.  There was also a problem of water condensing on the atomizing disc, which stopped the mist. (Apparently this is caused by using the incorrect water.  I tried distilled, tap and flat Pellegrino and it happened with all of them). Also it turned off after 60 seconds.


The mist would just hit the side of the mug, and then dissipate, so with the advice and assistance of a friend who happens to be a special FX guy (HI KIER!), I made a little pipe to direct the mist upwards.  I had to add little air holes along the bottom, otherwise the atomizer couldn't work.  I also added a few bumpers on the sides to it wouldn't wiggle around in the mug.  

Such a nice, gentle mist!

Until it stopped... You can also see how much water is condensing in the tube.

I cleaned the atomizer disc with a little vinegar, and that seemed to help.  Overall, it seemed pretty good to go for the show that night!


However, it wasn't perfect.  The mist/ steam was only located in one spot, and it was pretty weak.  It didn't have much visual impact.  

Idea 4: Harvest bits from a USB powered humidifier
This idea really built on #3, and solved several of our problems.  I watched a handful of youtube videos about making 'foggers' from humidifiers and I figured WHY NOT?!

I had our shopper pick up a HoMedics Personal Ultrasonic Humidifier from Bed Bath & Beyond.  They are cheaper if you order them online, but I'm impatient and was under a time crunch.  I chose this humidifier because it's USB powered, affordable, and small. 


I then proceeded to take it apart, all I really needed was the atomizer disc and circuit board. 


For power, I first tried a Mophie Powerboost Mini, but it was too large for our mug.  I went on a hunt to Ross Dress for Less, for a smaller powerbank, and got lucky!

Yes, that is a poopmoji.

I removed the battery portion from its novelty casing, and we had a rechargeable battery!  The charging port and power port are right by each other, which is very helpful.  I then hooked everything up to make sure it worked!  

Look at that mist!

The key to this set up is the atomizer disc having full contact with water.  This is also plugged into a power strip, and not the battery, for testing's sake.  (Plus the battery was charging).  


Essentially, the atomizer disc vibrates at a specific frequency and turns water into vapor.  SCIENCE!! However, if it's put under water, it can't make mist.  So to solve this, I opted for a sponge (really, just gray foam) in a condiment cup, filled TO THE BRIM.


I timed the mist output for this set up and it went for about 8 minutes before the atomizer couldn't pull water out of the 'sponge.'  If it was a real sponge it may have worked better, but I was concerned about color and we definitely didn't have a sponge that deep.  So I tried putting a lid on the condiment cup to squish the disc into the sponge a bit more. 


I cut a hole the size of the output portion of the disc and used some Joe's Sticky Stuff to stick it to the lid.  I filled the cup to nearly overflowing and smushed the lid on.  It was a bit of a mess, but this set up went pretty strong for nearly 17 minutes before the mist diminished!  I painted the lid, hooked it up the battery and tested it out!

SUCCESS! 

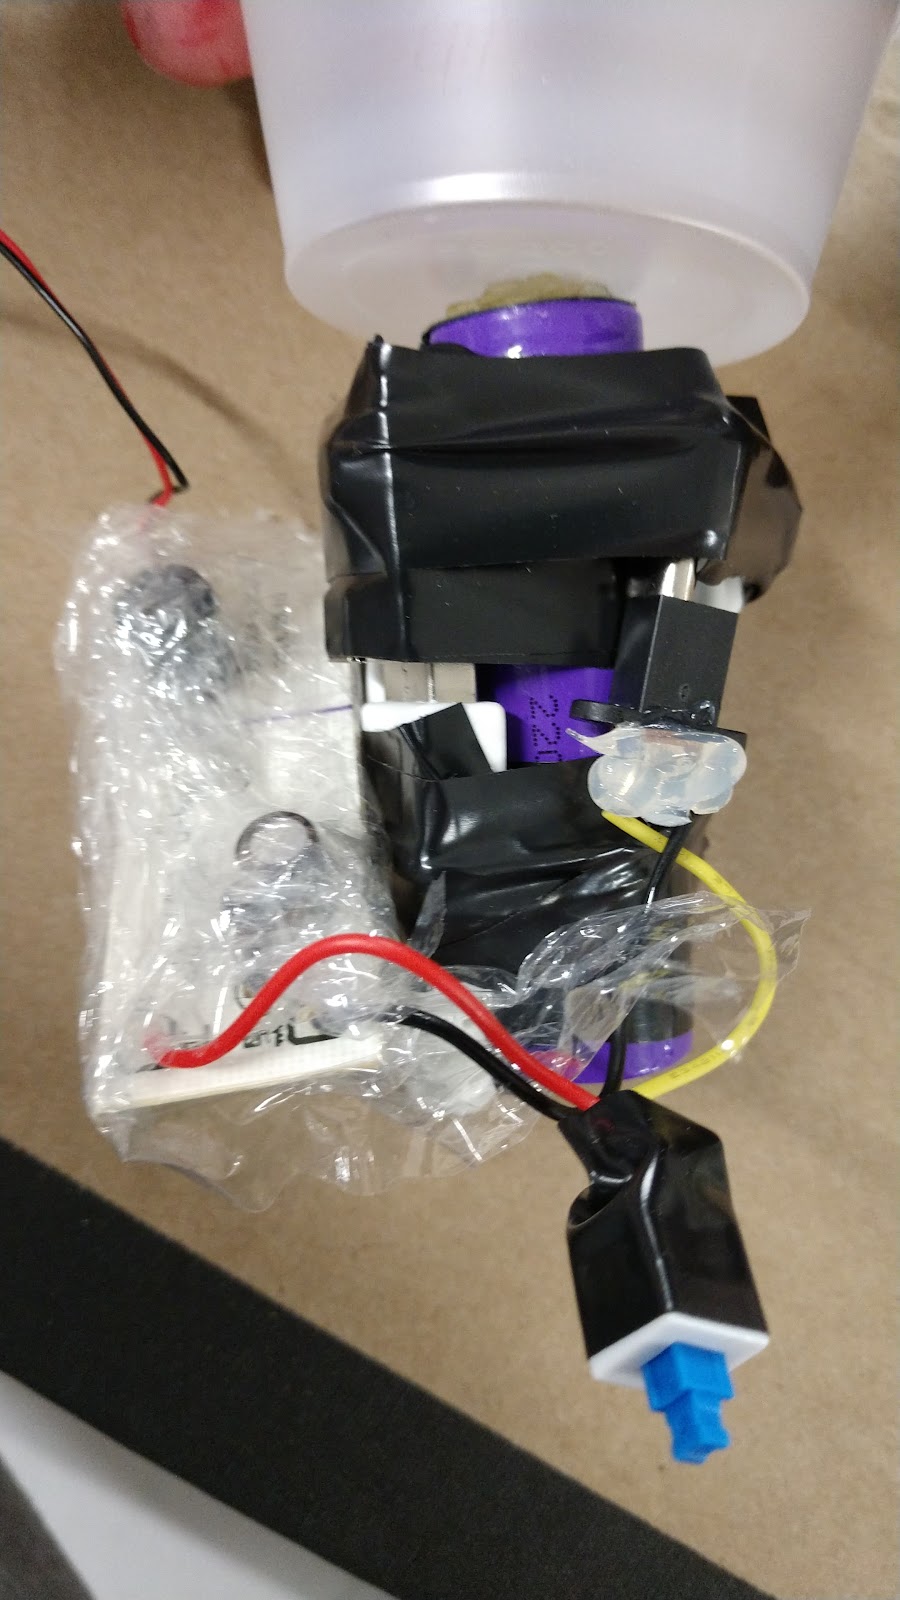
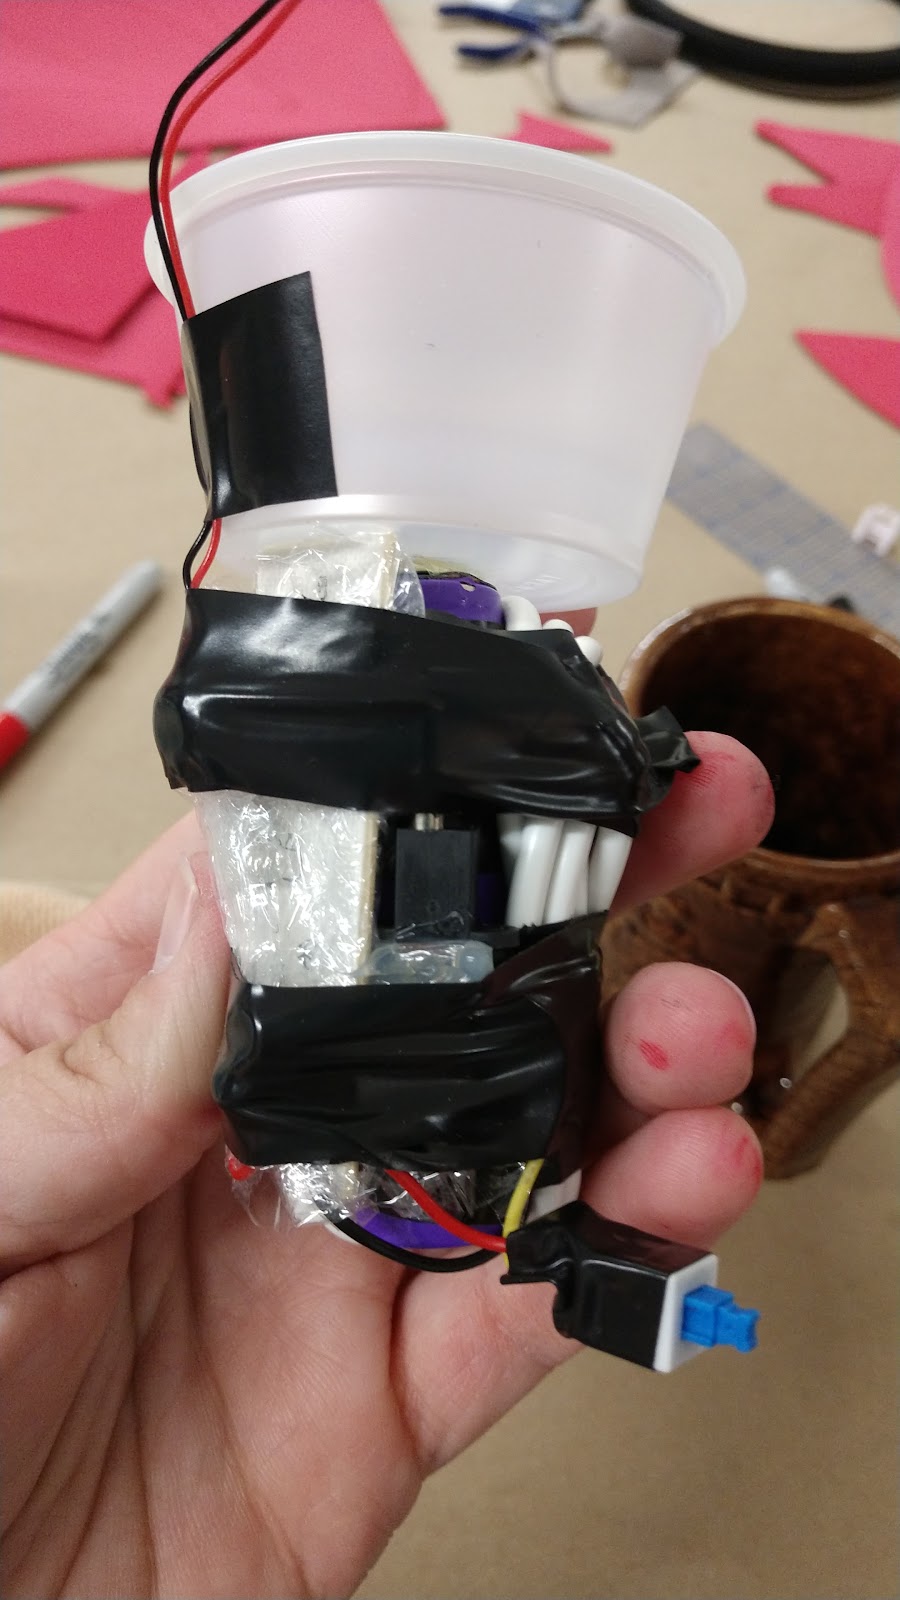
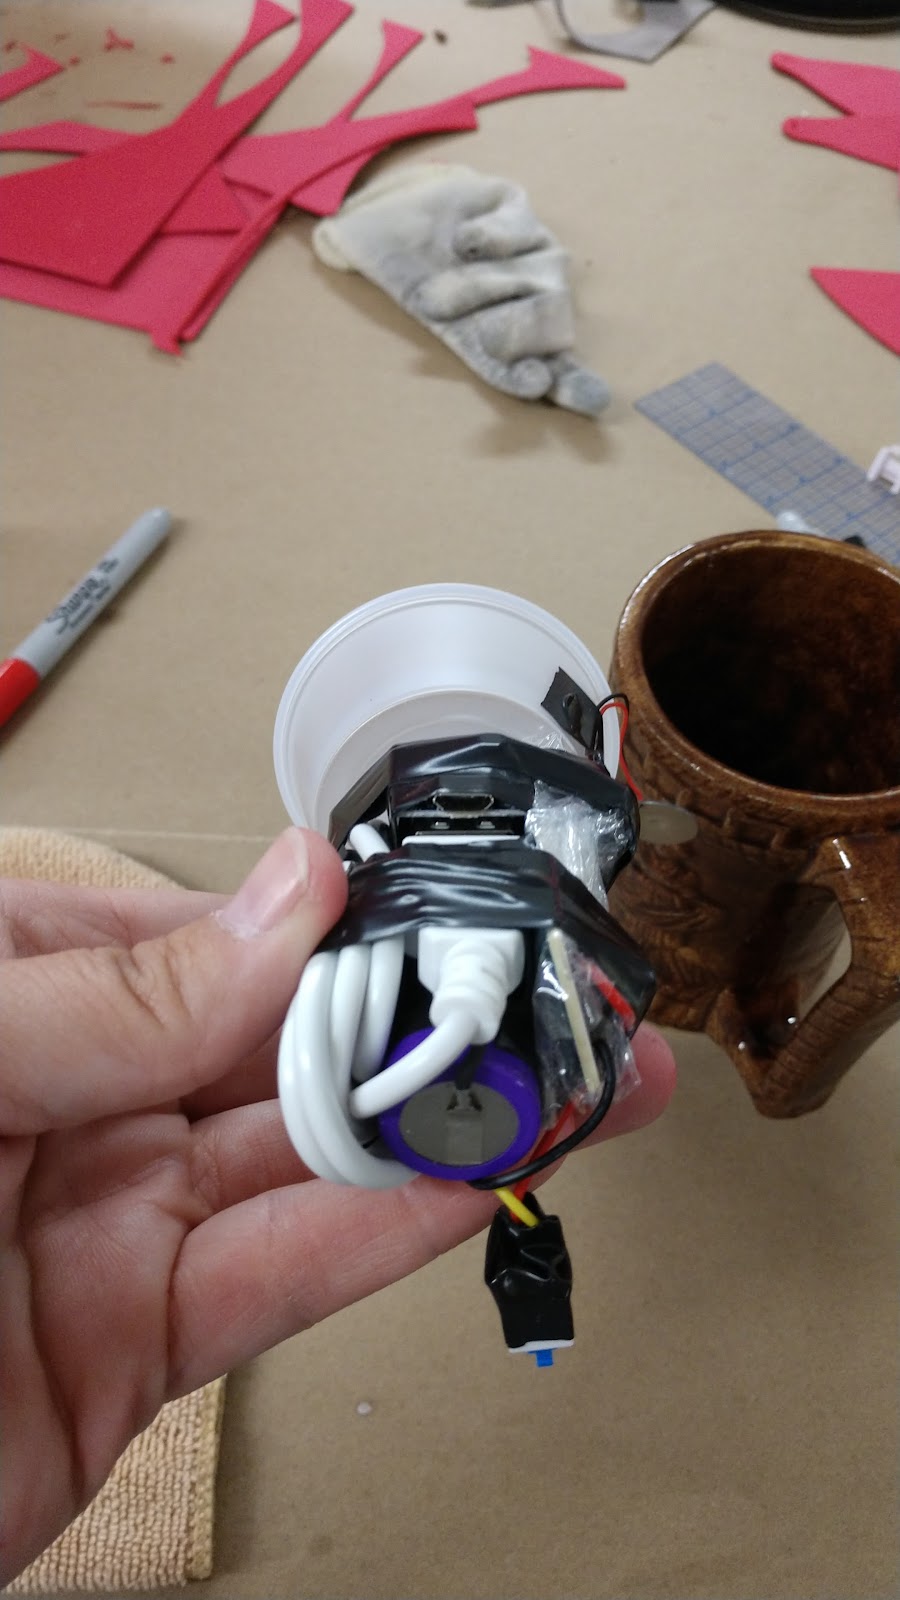
I then did a lot of creative wrapping, taping, and sticking to get The Setup into a small mass to put in the mug.  I wrapped the circuit board in stretch wrap so it wouldn't get wet.  I also stuck a second condiment cup on top to hold the water/sponge on top.  


As one can see, it's not very... delicate.  It technically fit into our mug, the condiment cup was just about the same size of the opening.  However, it was still only shooting up from one area, and it was quite vigorous.  I tasked an apprentice into looking for smaller containers, perhaps in our jewelry drawer, and she did not disappoint!


This perfume container is nearly the same size as The Setup, and I trimmed down one of the wicks that came with the humidifier so it was just taller than the perfume vial.  Beautifully, the atomizer disc was the exact right size to fit in the top of the lid.  I drilled a hole in the top and cut a slit up the side and slid it in, holding it in place with more Joe's Sticky.  


I taped the perfume vial to The Setup and stuck it in the mug.  There was still the problem of a single jet of mist, so an artful placing of the condiment lid did a pretty good job at diffusing the mist.  

Not too shabby!

However, I still wasn't satisfied with 'artfully placing' the condiment lid, and The Setup looked a bit of a mess.  So, I solidified the atomizer wire connection, cleaned up the perfume tube lid a bit, and made it so it didn't have to get taped onto the base. I also glued the humidifier on/off switch to the actual switch so it was easier to use. I covered almost all of it with e-tape so it would be dark in the mug.  You can still see a bit of the LED light, but only enough to know that the atomizer is on, or that the battery is charging.  To make it super easy for our run crew, I made it an elastic holder that can hold the perfume tube but can slide off so the charging port is accessible.    


Snug as a bug in a rug

To deal with the single jet problem, I made it a little hat!  A round piece of scrap plastic, with a few holes punched in, stuck on a plastic tube, cut at an angle.  It fits in the mug between the perfume vial and The Setup.  I spray painted it flat black (though it doesn't look like it in the photo) and added a little pull tab so it's easy to get out of the mug.  


Though it's still heavy to one side, the mist is pretty diffused and strong!


I did a time test for this (final) setup and there's a strong mist for about 15 minutes, and then it diminishes significantly.  The perfume bottle doesn't hold a lot of water, so that's still pretty impressive!


I'm pretty pleased with how it finally turned out.  I'll likely never see it on stage, but I hope the audience appreciates it!

Final Materials: Mug (stock), HoMedics humidifier bits, rechargeable batter with USB plug, USB power cable (from humidifier), plastic wrap, refillable perfume vial with removable lid, scrap plastic, plastic tubing, Joe's Sticky Stuff, black waxed thread, elastic, and SO MUCH electrical tape. 
Tools: Olfa knife, small Philips screwdriver, scissors, sewing machine (for elastic holster), pipette to fill perfume vial

I hope I get to use this trick again in the future!  You can buy ultrasonic atomizer discs on Amazon, and there are a handful of diagrams out there if you want to wire your own circuit board.  That's a bit out of my range, but always a possibility. Honestly, the big score on this project was learning that you can get poopmoji power banks.  What a world we live in!  Also some of my co-workers called me a science witch while working on this project, and honestly, I love it.  #sciencewitchforever

Tuesday, October 19, 2010

Dirty Martinis

Hey all! Sorry for the delay in a new post. I worked on a commercial shoot these last two weeks that completely took up my time. Please enjoy this week's post!

Materials: Acrylic Water (the kind florists use), Martini Glasses, Toothpicks, Sculpey, Acrylic Paint, Spray Paint


So, this is a project with a couple of issues- one was an I-D-10-T error (I was being an idiot) and one was more about being unfamiliar with the materials.  I'll explain both when we get there.  These martinis were made for  Milwaukee Repertory Theater's production of  'Cabaret.' We needed spill proof champagne and martini props for the Kit Kat Klub patrons to wave about while they caroused.  I did a few samples before I settled on the Acrylic Water. Neither Smooth Cast 325 nor the year old Zeller Opti-Kleer that I had in stock was water white or bubble free, so I ran over to my favorite floral wholesaler, and picked up a bottle of Acrylic Water.  This is a two-part acrylic resin that is used in the vases of silk floral arrangements to simulate water.  It is easy to work with, water white, virtually bubble free, and has a beautiful refractive quality in a glass. I've never used it before, but I was eager to give it a shot, and I'm glad that I did. (There was no MSDS, and I didn't have time to request one, so I took the same precautions as I would with any two part resin. I used the appropriate PPEs, and worked in a ventilated area.) 

Jim Guy, my boss, and Props Director Extraordinaire, found these acrylic martini glasses at World Market.  Aside from having a nice look, the thick stems are sturdier than a typical martini glass, which helps to keep them from breaking or tipping when the acrylic makes them top-heavy.  Aside from the glass, the most important identifying characteristic of a martini is the olive.  These olives are made from white Sculpey brand polymer clay. 
Aren't they hilarious? White model olives!
White was the only color of Sculpey that I had on hand, so I had to paint them.....but I'll get to that later.  I shaped the olives by hand, and used a pen cap to give them the round impression that looks like a pimento. I decided to put two olives in each glass, to add color and help take up volume. Then, I made a stupid mistake. 

I decided to put the two olives on skewers before baking them. This was not the stupid mistake.  I went down to our stock hoping to find metal toothpicks. Faced with the decision between wooden toothpicks and plastic toothpicks, I chose plastic. The voice in my head said "Don't do it, they'll melt in the oven," but the tired part of my brain that had been working too hard said "Nah, it'll be fine." STUPID!  Here's something I've learned in theater and life. If that little voice in the back of your brain pipes up, it's usually right, don't ignore it.  So I baked the Sculpey olives on their plastic toothpicks, and I melted the plastic toothpicks. I didn't melt them entirely, just enough to make them misshapen and saggy.  Stupid.  Since I was working with limited time, I did my best to straighten them out, painted them silver, and carried on, hoping that the refraction of the acrylic in the round glass and the distance to stage would help me out.  Luckily, for the most part, they did. 

Olives before baking.

I also painted the olives. For the green of the olives, I used Design Master spray paint, for the pimentos, I used red acrylic paint.  I probably should have given the spray paint a bit more time to cure, but as I said before, we were pressed for time.  I dropped a skewer of olives in each glass, mixed the acrylic according to the directions, poured the martinis, and left them to cure for 24 hours. 


Once cured, the acrylic is beautiful and durable,  The overall effect from stage is actually very good. There was no reason not to send these martinis on stage. There was, however, a swirl of paint coming off of the olives into the martini.  It looks pretty cool actually, but it isn't part of what I intended the martini to be.

See? GRRR!

I think that if I were to duplicate this project, I would use green and red Sculpey instead of attempting to paint white Sculpey. As it was, we said that I meant to do it, called it a dirty martini, and sent it onstage. I highly doubt that the audience, or even the performers, noticed that anything was amiss.  It wasn't  the perfect prop that I would have liked it to be, but I learned a few things, and got to try a new product, so I can't complain too much.  But hey, if I did it perfectly the first time, what would be the fun of doing it again? Cheers!

Wednesday, September 22, 2010

Proppy, Proppy, Punch Bowl

 Materials:  Punch Bowl and Ladle,  Artificial Fruit Slices, Clear Acrylic Sheeting, Design Master Spray Paint

 Behold the proppy, proppy punch bowl from our current production of Cabaret*!  This one surprised me, folks.  I went back and forth with my boss about what should be in this punch bowl.  The conversation went something (nothing)  like this:
Me: Jello?
Boss: Spoilage
Me: Acrylic? Resin?
Boss: Heavy and expensive.
Me: Punch?
Boss: Now you're not even trying.
Me: Well, what do you suggest, smart guy?
Boss: We used to do this trick in opera with Plexiglas and spray paint.
Me: BAHAHAHAHAHAHA!
Boss: You got any better ideas?
Me: ..........................

And that is how the proppy, proppy punch was born.  Frankly, its success surprised us all. 

First of all, I taped a fill line around the inside of the bowl. Then, I cut a piece of acrylic to fit into the bowl at the fill line, and cut out a notch along the edge for the ladle.  Once this was done, I spray painted the inside of the bowl, and the bottom of the acrylic.  I used design master paints, Cherry Wood Tone and.....one of the berry colors. Cranberry, maybe.  I wanted it to look more like a wine punch than Hawaiian Punch, so I tried to keep the color subdued.


All that was left was to assemble the punch. I used snot tape to hold in the fake orange slices and ladle, and even to hold in the acrylic top.  I most likely could have used something more permanent to hold in the acrylic, but I wasn't sure what was a better option.  At least this way, I can disassemble and reuse the pieces when the show comes down.  A few orange slices on top completed the punch (one small slice behind the ladle hides the notch.)


 And that's it, the proppiest punch you ever did see! It sat on top of a buffet counter loaded with treats, and surrounded by beautiful people in their undies.  Did it steal the show? No. Did it do the job? Yes.

 If I were going to put a punch bowl smack down-center, this technique might not cut the mustard.  Scratches in the paint give it away, as well as the tell tale clear edge of the acrylic, (though perhaps this could be remedied with some judicious Sharpie action).  It is by no means a perfect solution, but it is light weight, simple to make, and effective from afar. 


 *(I will not title this post 'Punch and Jew-dy Show', I will not title this post 'Punch and Jew-dy Show')

Categories

props (35) fakery (31) faux (25) food (25) fakefoodfriday (24) theater (24) Fake Food Friday (22) cake (10) foam (9) kitchen (9) caulk (7) Albert Herring (6) casting (6) insulation foam (6) opera (6) Design Master (5) Smooth-On (5) booze (5) desserts (5) drink (5) edible (5) jaxsan (5) microfoam (5) molding (5) acrylic (4) carve (4) ham (4) resin (4) acrylic caulk (3) beverage (3) candy (3) cheese (3) cocktail (3) dressing (3) fruit (3) latex (3) model magic (3) period (3) upholstery foam (3) urethane (3) vintage (3) Helena Mestenhauser (2) Ilana Kirschbaum (2) Sarah Heck (2) acrylic paint (2) appetizers (2) brownie (2) casserole (2) chocolate (2) confection (2) decorating (2) dial (2) ephemera (2) fish (2) flower (2) foam sheet (2) gel wax (2) hot pour vinyl (2) leg (2) link (2) mocktail (2) mother mold (2) pies (2) pizza (2) reference (2) research (2) safe (2) salt dough (2) sandwiches (2) tutorial (2) wrappers (2) Canapes (1) David Russell (1) Dowel (1) Dragonskin (1) Ellie Bye (1) FX (1) Flex Foam-It (1) Fritos (1) Introduction (1) JT Ringer (1) Jess Smith (1) Keli Sequoia (1) Materials Monday (1) Oona Tibbetts (1) Poultry (1) Sara Pool (1) Serena Yau (1) Skylight (1) Smoothcast 325 (1) Turkey (1) Victoria Ross (1) Wonderflex (1) Worbla (1) alcohol (1) alginate (1) apoxie (1) aspic (1) banana (1) bead foam (1) bread (1) bundt (1) cabbage (1) carnation (1) cellophane (1) champagne (1) cheesecake (1) cherries (1) chilaquiles (1) citrus (1) clear (1) coat (1) coke (1) cola (1) contact adhesive (1) cork (1) cotton batting (1) cream (1) drinks (1) dumplings (1) fake steam (1) faux mex (1) flexcoat (1) fondant (1) fruit salad (1) glass (1) great stuff (1) gum paste (1) hands (1) herring (1) hors D'ouevres (1) icing (1) intern (1) joke (1) katie webster (1) kolache (1) labels (1) lettuce (1) life casting (1) liquid (1) martinis (1) marzipan (1) meat pie (1) menu (1) mini fogger (1) mini mister (1) nougat (1) olive (1) olives (1) oranges (1) pan dulce (1) paraffin (1) pastries (1) pastry (1) peas (1) petit fours (1) pickled herring (1) pie (1) pie crust (1) pineapple (1) prosciutto (1) punch (1) restaurant (1) samosas (1) sculpey (1) shrimp (1) small pastries (1) snacks (1) soda (1) sorbet (1) spilled (1) stage effects (1) sugarplums (1) sweetmeats (1) sweets (1) taco (1) tomato (1) tuna (1) tv dinner (1) vacuform plastic (1) violets (1) wax (1) welcome (1)