Showing posts with label insulation foam. Show all posts

Friday, June 21, 2019

Cocktail Shrimp! - #fakefoodfriday from Sara Pool!

This week's post is a little different, as I asked the lovely Sara Pool to send me the pictures for these delightful shrimp, but I'm going to write the process up, because I witnessed the magic FIRST HAND, as she and I work at ye olde Opera together.  We are also currently co-craft heads on La Boheme, and that's what these shramps are from!  (Yes, I did say shramps.  You can thank our lovely founder Anna for planting that one in my head years ago, and there it remains.  SHRAMPS!) Onto the crafting!

Materials: Insulation foam, Crayola Model Magic, scrap vacuform plastic, acrylic paint, hot glue
Tools: Olfa knife, sandpaper, scissors, cheese knife, clay tools

These shrimps started out as many food projects do, with the general shape cut from insulation foam.  

However, we only had 1 inch foam, which was a bit too hefty for our shrimps, so Sara cut them all in half.


Then there was some sanding 

So shrimpy

For the tail, Sara cut some scrap vacuform plastic into tail shards (shards seems like such a harsh word, but I can't think of anything better?)


Those pieces were then glued into the tail of the shrimp body with our good friend hot glue


To give the body some more dimension, the foam bodies got some Model Magic detailing


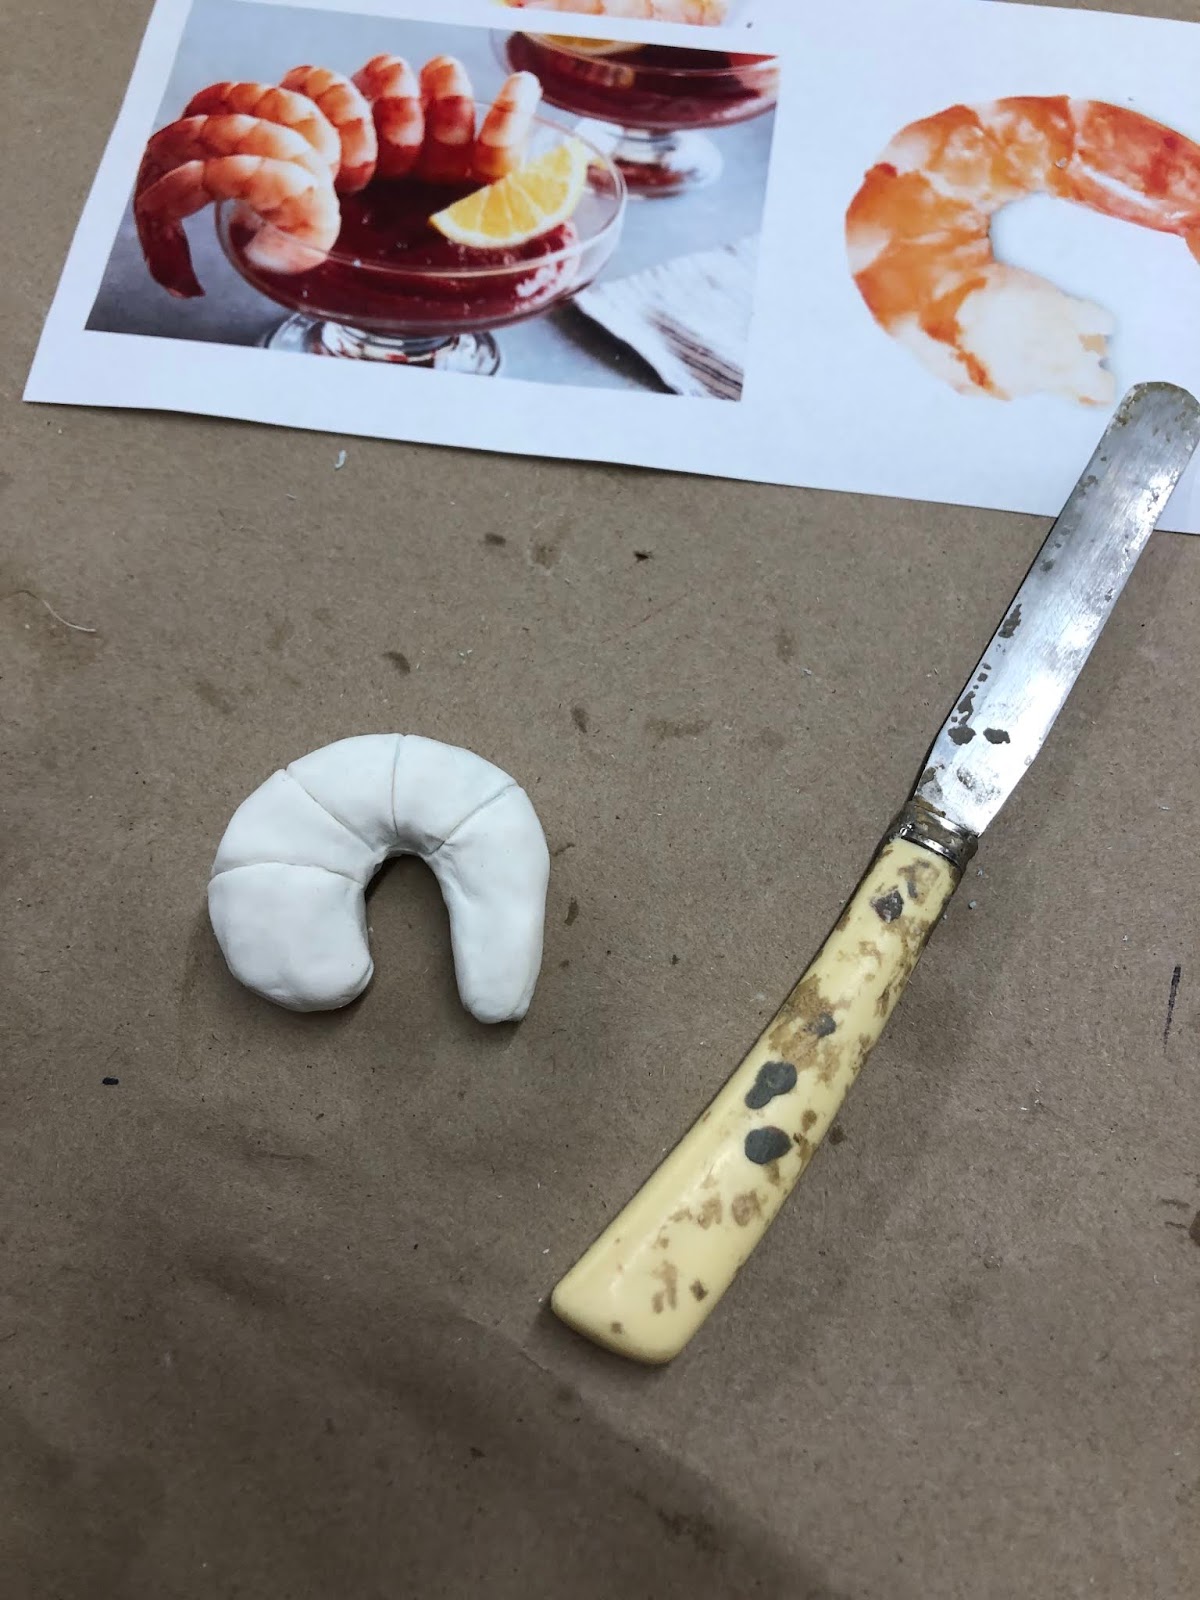
(I had suggested trying some fun foam for the shell, but that was a BAD IDEA and the poor shrimp looked like a tiny croissant)


Some artful indents gave the illusion of the shell segments really well!  To achieve this, Sara used a combination of some clay tools, and also a dull cheese knife (honestly, I can only assume this was a cheese knife... it's been in our carving tools since before I started)

This was a segment trial, before the tail was added!

At this point, during a break, Sara made the astute observation that her toes and the shrimp were quite similar

#summerstockobservations

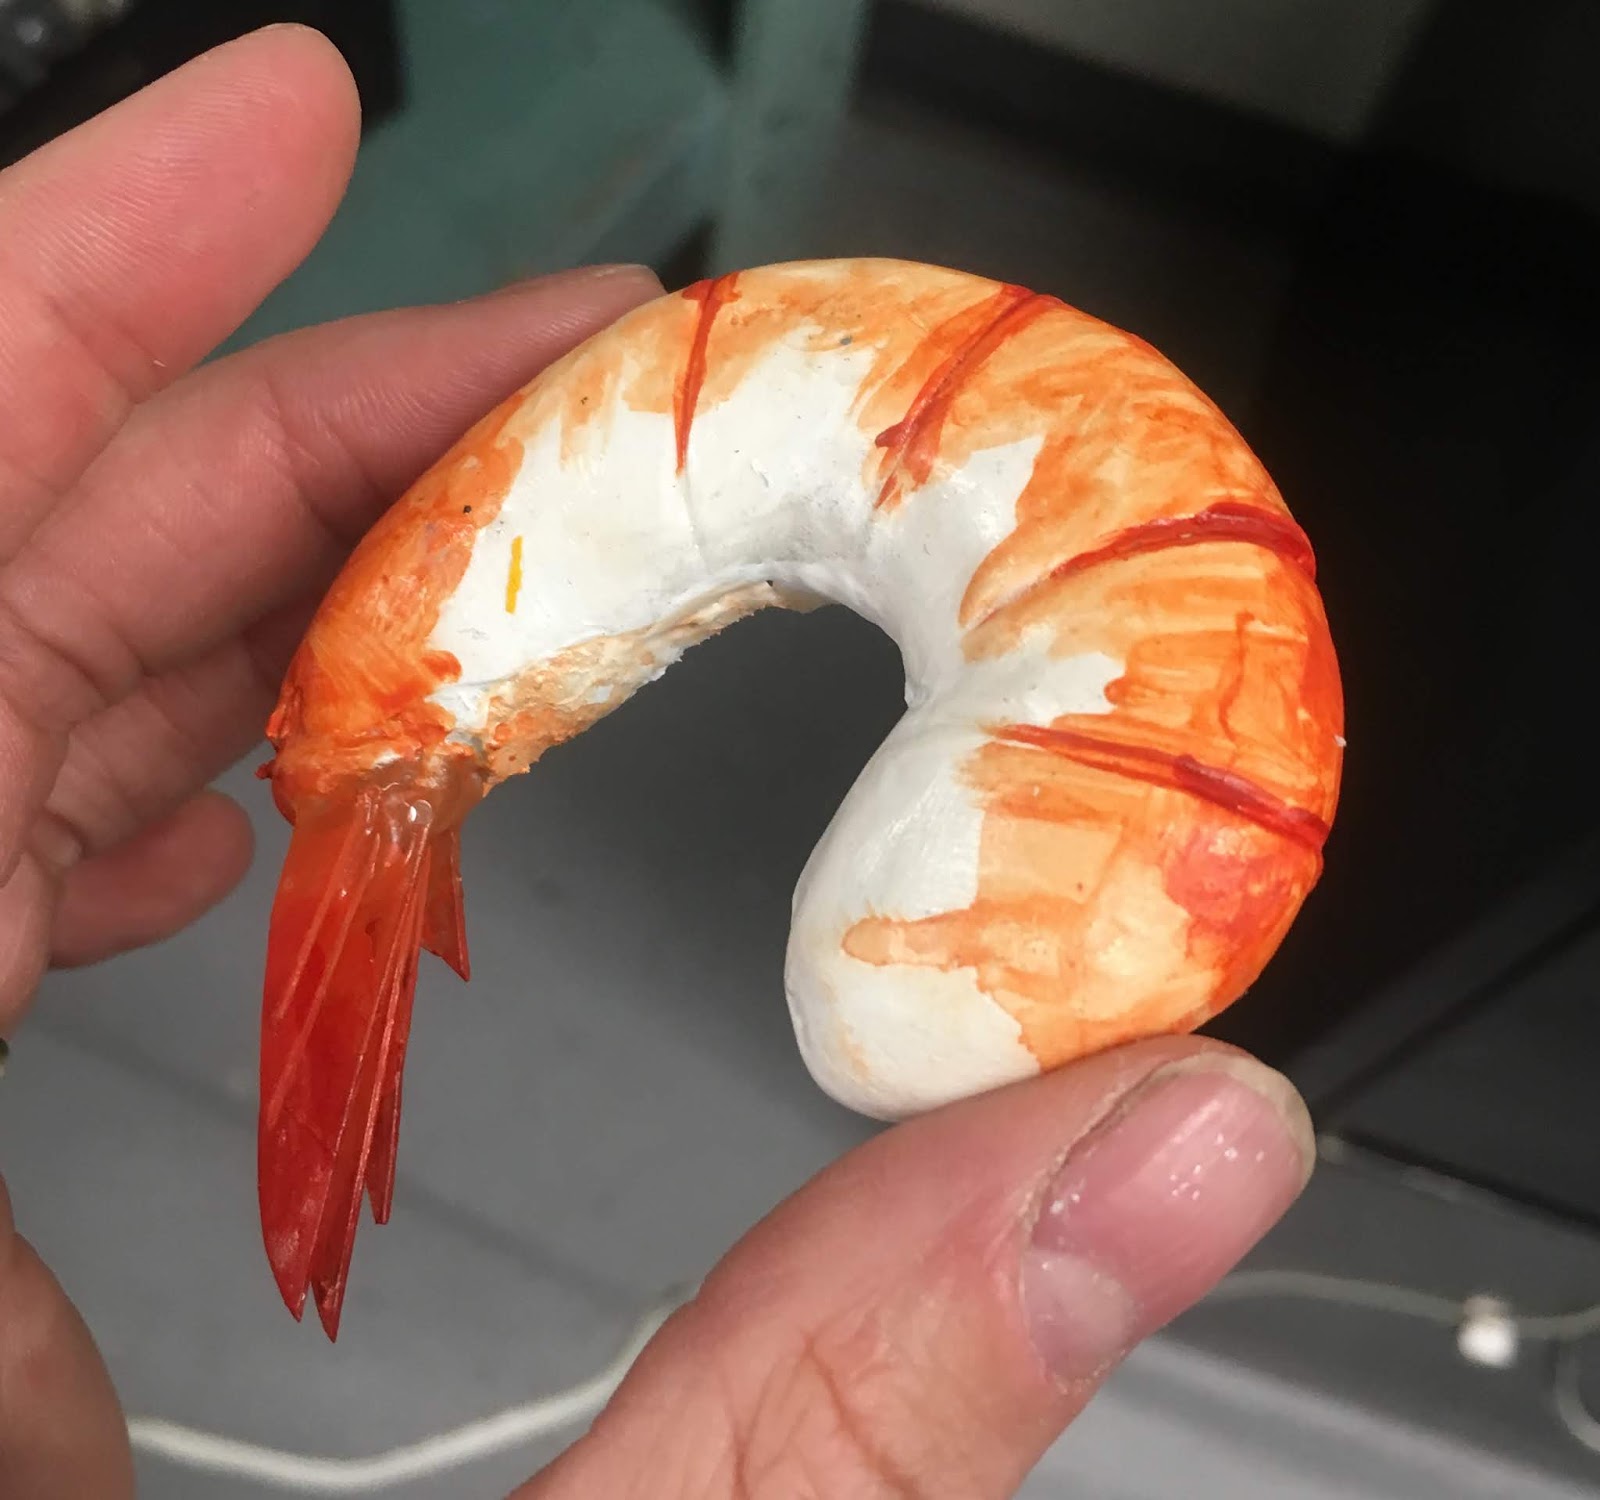
Then the shrimps were sent off to one of our very talented painters, Serena Yau, who brought them TO LIFE.  Well, to beheaded, steamed, and put on ice life...

Trash Rat Approved!

Eventually these shrimp ended up on a tiered seafood tray (as previewed in the shrimp to pic) surrounded by fake ice.  So good!!  Boheme opens in one week from today and I can't wait to see these on stage!  
You can see more of Sara's work here and Serena's work here.  Happy Fake Food Friday, and Prop On!

Friday, May 31, 2019

Petit Fours - #FFFriday Guest Post from Helena Mestenhauser!

For this week's #FakeFoodFriday, we have another guest post from Helena Mestenhauser, with a super cute set of petit fours!

---------------------------------------------------

Materials: Insulation Foam, Rosco FlexCoat, Extra Heavy Gel Medium w/ stained glass paint
Tools: Bandsaw, sandpaper, brushes, piping tips and bags

These petit fours are very cute but definitely aren't quick: in order to get the very smooth frosting finish I did multiple very wet coats of Roscoe flex coat and let them naturally dry which was at least 24 hours between coats so be prepared for that!

For any piece of sheet cake style pastry I usually start with cubes of foam cut out on the bandsaw. 


Petit fours have a rounded top shape so I hand sanded the top and side edges to help that shape seem a little softer.


Then it was time for coats of Rosco flex coat. Each layer consisted of a painted on full layer of flex coat smoothed over immediately with a coat of watered down flex coat at about a 1:1 ratio. This allowed the flex coat to really stick and create a dimensional layer but the water still allowed it to smooth over nicely over time as they dried slowly. The first coat was just straight up flex coat- no paint to tint.


The second and final coats (for a total of 3 coats) were both colored- the pure flex coat was tinted with both a little bit of cal-tint and with some white paint. The white paint is important, don't forget it! Flex coat dries clear so if you want the petit fours to be pastel in color you have to add white! 

I didn't bother to tint the 1:1 watered down flex coat for this step: it barely holds color anyway so its not worth trying to tint it as well. 

When your petit fours are fully dry, its time to pipe on some lovely flowers! Kate Stack (instagram handle @k8stack) piped these and they really make the petit fours shine. We used extra heavy gel medium with stained glass paint for our piping to give it a little translucency, but really any spackle with paint through a cake tip will do. As with other fake frostings its super easy to use regular cake piping tips and bags and just swap real frosting for fake, and you can do all the same techniques! Our flower technique requires two different tips: a rather flat one for the leaf, and a medium sized ruffle tip for the flower itself. 


Make sure you really let your frosting dry! Move them too soon and you risk accidentally smooshing them. Bon Apetit!


------------------------------------------------------------------------------------

Thanks, Helena!  These look completely delightful.  I love a tiny treat, especially ones that look so delicate.  

Monday, March 4, 2019

Materials Monday - Insulation Foam


Anna's Foam blank for Fauxsciutto

Pink foam.  Foam board.  Blue Foam.  Rigid Foam.  Foamular.  That stuff with the Pink Panther on it.  Insulation foam has a lot of names and even more applications! 

Upholstery, bead, or insulation foams are standard base for a lot of fake food, but choosing what kind really depends on the project you're working on.  We will explore all of them eventually, but first: insulation!
Insulation foam has been featured in a few posts on the blog: Cakes ala DavidCheesecake and most notably, Fauxsciutto!  

Building:Insulation foam is a great choice for stability, as it doesn't break apart like most bead foams.  You can find it in several sheet sizes and thicknesses which gives it a lot of versatility.  For large projects, insulation foam can be stacked (laminated) together, as you can see in the picture above.  

Where it really excels is detail.  Carving shapes into pink foam will hold edges and designs.
(This is the only time you will see these buns, as the finished product was rough, at best.  Let's just say my painting skills have come a long way since 2010, and it's a good thing these ended up in the trash once the show was closed.)

Carving swirls into these cinnamon buns was very easy with an Xacto knife.
Insulation foam also sands easily and evenly (unless you have a lamination line, and then it can get a bit tricky...).  

Like bead foam, insulation foam is a great material to use as a false bottom or a firm filler.  I used insulation foam here because I needed to carve a hole for the spoon and I was worried bead foam wouldn't be able to hold the weight.
Need a dip?

Adhesion & Lamination: Like most foams, you can't just use any glue to stick it together.  Spray adhesive and some contact adhesives like  Dap Weldwood Original will eat away at the foam.  Hot glue will melt it  and shouldn't be used for laminating, but low temp will work if adhering to a plate or something, especially if the foam has been coated.  (In the photo above, the hot glue melted the sides and top, but I needed texture anyway, so it worked out) 
3M FastBond Contact Adhesive 30NF is an excellent choice for laminating sheets of foam for large projects.  It comes in tan or green, and it's a low VOC formula.  It doesn't smell awful, but, as with all adhesives, should be used in a ventilated area.  Safety first, y'all!
Unfortunately FastBond isn't the easiest to get, but DAP Weldwood Nonflammable Contact Cement is a safe bet.  It's carried at the big hardware stores in small quantities, so if you're a freelancer or small shop, it's a great choice.  
Both can be rolled on with a paint roller for large sheet lamination, or an old chip brush works just as well!

Side note: I once worked in a terrible fabrication shop that ran out of green glue, opted to use spray adhesive INSIDE, then when that ran out, decided that wood glue would work, "just fine" to laminate several 2'x4' sheets together into a huge tower.  Shockingly it didn't work and I didn't go back.  

Finishing/ Paint Prep:  This all depends your final goal, but there are several ways to seal coat your foam.  
A pricey and sturdy route is Rosco Foamcoat.  It will give your piece a hard shell, which is good if you think it's going to get handled roughly, which is why I used it for the Cheesecake.  
Aqua-Resin is a liquid & powder composite resin that gets very hard when cured.  It's also pricey, but I know some carpenters swear by it.  It's likely a bit overkill for fake food, but who knows what we might need a cake to do?
Jaxsan 600 is an excellent choice for foam coverage, but it does have some texture, which could be a deal breaker depending on the project or house size.  Jaxsan is tintable, which makes finish painting faster and easier.  (I love that Jaxsan has a theater tab on their website now.  They've embraced us!)
For a lighter touch, a coat of thinned out Flex Glue and cheesecloth or tissue paper will give your foam a paintable surface.  Don't want to spend $60 on a jug of Flex Glue?  Regular white glue will work, it's just less flexible when dry.  I have definitely used unthinned bottles of white glue from the Dollar Tree because when your budget is only $350 every little bit helps.  You can also get a package of tissue paper from Dollar Tree, because they're a freelance prop artisan's best friend.  
Straight paint: I don't suggest this, but sometimes you've just gotta do what you must.  Those ugly cinnamon buns from earlier were painted without any coating, using acrylic paint.  It stuck okay, but they were only display items, and you could see all of my sanding and carving flaws up close.  Thankfully they were under glass and upstage, but I would definitely do it differently if I had to make them now.  

A note about spray paint: if you do not seal your foam in any way, spray paint will eat away at it.  Design Master Floral Sprays are less destructive, but if sprayed too thickly will still degrade your foam.  This could be used as a distressing technique, but if you do that, please, please be in a very well ventilated area and wear a respirator.  Foam melting releases all sorts of awful things that are VERY BAD for you.  

Insulation foam scrap also makes a handy stand when you don't want your item sitting on a surface.  These crusts are made from 1.5" pink foam, covered in flex glue and muslin (I was on a time crunch and we didn't have cheese cloth or tissue paper, the horror!) with some hot glue cheese and red paint sauce.  

What other materials would you like detailed on a Materials Monday?  Send me an email at fakebakeprops@gmail.com or leave a comment below!

Friday, February 8, 2019

Fake Food Friday: Cheesecake!

Materials: Insulation foam, foamcoat, acrylic paint, spray sealer, clear epoxy, cheesecake packaging, sticker paper
Tools: Bandsaw, surform shaver, sandpaper

Hi All, welcome to our first Fake Food Friday!  I thought it would be appropriate to have our first FFF be the prop that started it all!
This cheesecake and its plated version were for You Got Older at Steppenwolf.  The packaged cheesecake came out of a grocery bag, and then later it came out on a plate, had two full size taper candles put on it, and two pieces cut out.
I started out with 1.5" insulation foam, cut into circles about the same size as my research cheesecake (yes, we all ate some after I was done!).  I used a Surform shaver tool to shave down the middle and give it a bit of an edge.  I then sanded that down, but I didn't spend too much time smoothing it out, knowing I was going to foamcoat it.
For the practical version of the cheesecake, I cut out two holes and inserted PVC pipe ends that fit the candles pretty well.  Then I did several coats of Rosco Foamcoat.  I tinted it by adding a bit of acrylic paint.


I built up a nice shell on the practical version and then cut out a quarter of the cake.   It was filled with a quarter of real cheesecake for the show, and then a layer of cheesecake filling (which is totally delicious and something I have 100% eaten straight out of the tub.)  And then I sanded it SO MUCH.
Because the foamcoat was already yellow, I didn't have to do much finish painting, but I did add a quick coat of light yellow and brushed on a bit of raw sienna to make the edges look cooked.  I then sealed the full one with clear satin spray.  For the practical cake, I sealed it completely with epoxy because I knew it was going to be by real food and washed every night.  I ended up sanding it down with some 220 grit sand paper so it wasn't too shiny.  I didn't get a picture of it though.
As we like to say on this blog, packaging SELLS IT.  This shell is from our research cake, which was conveniently empty by then... I found a logo online and printed it on some sticker paper.  As I said when I first posted it, I'd eat it.  
Unfortunately, my sticker was too subtle and we ended up taking the insert that came with the cheesecake, scanned it, and edited it so it was no longer so Chicago-y, (speaking of, if you find yourself in northern IL, I highly recommend trying some Eli's Cheesecake, which served as research and supply for our show).  This shop had a tabloid size printer, so we were able to print this on one sheet, making it look super professional.  Even though you can't see much of my cheesecake, I'd still eat it.  

There we have it, folx!  I think I need to go get some real cheesecake.  Or just some filling, I'm not picky.  Happy FFFriday!

Sunday, February 28, 2010

Fake-n-Cake


Project: Fake Cake

Materials: Foam (Insulation or White Bead Foam), White Acrylic Caulk (4-6 Tubes), Acrylic Paints, Green Glue (3M Fastbond Contact Adhesive.)


Tools: Spatula, Disposable Pastry Bags, Decorator Tips 32, 104, 4, and 352, Lazy Susan/ Cake Decorating Turntable (Optional)

First, a word about tools.  Cake decorating is a perfect example of a project which uses real food preparation tools with non edible chemicals. Always be sure to store food safe tools/containers separately from non food safe tools, and label them well.  If you are storing actual, food-safe, prep supplies in the shop, make sure they are stored in closed containers to protect them from contamination. Remember, once a tool or utensil is used once on something that is not food-safe, it is no longer to be used for edible food preparation. Now, back to your regularly scheduled blog.

Foam is a really good base for onstage cakes, it is lightweight, easily shaped, and fairly durable. Best of all, it doesn't crumble like real cakes do, so it is easy to frost.  For this cake, I used white bead foam, first cutting it to size (9" Diameter circle) on the band saw, then gluing the two layers together with green glue. Before frosting, I rounded the top edge slightly with sandpaper.

The frosting is white acrylic caulk. The caulk is easy to work with, can be colored by adding acrylic paint, and can be smoothed with water when wet. When dry, it is paintable, durable, and somewhat flexible.  When frosting a cake, you want to start with a big blob of frosting on top, and spread it outwards with even strokes of your spatula. If you need to add more frosting, add it to the center blob, and work it into the frosting that is already down. This helps to make a smooth finish (and, in real cakes, keep crumbs out of your frosting.)


When you get to the edges, let the frosting fall down the sides of the cake before smoothing it down. To get the sides straight and smooth, hold your spatula upright, at a 45 Degree angle to the cakes edge and, in one continuous motion, gently smooth the frosting around the cake. See how the blade is tilted away from the cake in the photo? Don't do that....hold it straight. (It's hard to take a photo and frost at the same time.) This is where the Lazy Susan really comes in handy. Being able to turn the cake while you smooth is a big help.

Like real butter cream frosting, acrylic caulk can be smoothed with water for a nice, finished look. Wet your spatula lightly, and smooth over any folds or lines. Keep the blade of your spatula clean by wiping it often with a damp rag. No frosted cake is as smooth as glass, so some imperfections will give it a realistic look.


Once the first layer of frosting is complete, you can start piping. For this cake, I used a simple shell border on the top and bottom of the cake. (See my next post for more details about decorating this cake.)
 
  
After the caulk had dried, I dusted it with Design Master Butter Cream paint, to dull the white down a bit. Then, I mixed small amounts of white caulk with yellow, orange, and green acrylic paints to make the colored frosting for the cake's decorations. (And by the way, this isn't an incredibly awkward bundt cake, the hole in the middle is the fixture I installed for the fake candle that is taken out of the cake during each performance.)
I piped the decorations on, let the cake dry, and TA-DA!

 
Some cakey links:
As I mentioned earlier, I plan to do my next post detailing the decorations on this cake. However, if you just CAN'T wait to see how it's done, I recommend visiting the Wilton site for more information.
While you can buy a decent selection of cake decorating supplies from the big box craft stores, I always like to frequent local businesses when I can. Your local cake decorating store will most likely have a larger selection of tools and, more importantly, staff who actually decorate cakes and can answer your questions. If you don't have a local cake decoration supplier, and you have the time to order online, please consider Cook's Cake and Candy Shop, located in Milwaukee and on the internets. They have thousands of items for cake and candy making, and helpful staff who know what's what about cakes.  When I needed silver edible ink to write on sheets of dried seaweed, these ladies pointed me towards silver fondant glaze. When I retire, I hope to be a Cook's Cake lady.
If you are looking for some hilarious cake failures, this is your site. You can spend hours looking at fail cakes, with the occasional success thrown in for good measure. I promise that you won't be disappointed here.

Monday, February 8, 2010

Chocolates

Project: Chocolates
Materials: 1/2" insulation foam, brown and white acrylic caulk (with silicone), plastic baggies, Krylon Crystal Clear


The show we're about to open calls for a tin of chocolates to be hidden in a drawer. While we have a few little bon-bons in stock, I've been asked to create a few chocolates to supplement the collection. Chocolates are often faked onstage, as real chocolates melt easily under theatrical lighting. Fake chocolates are readily available if you have the budget, but as this is a fairly simple and straightforward project, you can save the money by faking your own.
The first thing to do is find a research image. A quick search on the internet can provide us with a plethora of chocolate photos. Since I have a small, square chocolate in mind, we'll go with this lovely morsel.

Second, gather your materials. I am assuming
that you are working in a space stocked with the basics, so I haven't included basic tools and supplies on the materials list. Let's begin!


1. I used 1/2" thick insulation foam as a base for these chocolates. It is cheap, readily available, reasonably durable, and lightweight. I started by cutting the foam into 1" squares with a utility knife. Then, I sanded the top edges and corners with 100 grit sandpaper to round them over, as the top of most dipped chocolates is not perfectly square. I always find it helpful to make a few extras of whatever I'm creating, if possible. That way, I can make some mistakes along the way.


2. Next, I coated the edges and the top of the chocolates
with brown acrylic caulk. I like to wear gloves to keep my hands from getting messy, and use a tongue depressor to spread on the chocolate. Once the top and sides are covered with a good layer of caulk, I dipped my finger in water and used it to smooth the caulk out. Then, I placed the chocolate on a piece of tin foil to dry.


3. After allowing the caulk on the chocolates to partially dry, I piped on the decoration. When doing small projects like this I've found that snipping the tip off of a plastic baggie makes a great disposable pastry bag. The piping took a bit of practice to get the feel right, so those extras that I cut came in handy. I did most of the piping in brown caulk, but I also tried the white, for a different look.


4. After the tops and sides were dry ( a few hours), I flipped the chocolates over, and coated their bottoms with caulk. Once the chocolates were completely dry, their color looked good, but the caulk was a little dull. I used a light spray of Krylon Crystal Clear, Satin Finish to give them just a bit of a sheen.

5. Presentation. My Dad once told me that food is 90% presentation. This may not be true in real life, but it certainly is in food fakery. These chocolates were each placed in a candy cup (available at candy making shops or big box craft stores), and placed in a tin with our other chocolates. The tin, painted by Margaret, is partially empty to allow a deck of cards to be hidden inside.
TA-DA!

Need more info about chocolate? Here are a few links to some good propsy info. Enjoy!
Here is a link to Hershey's company history, with a few good pieces of graphics reference for you ephemera hounds.
http://www.hersheys.com/discover/history/company.asp
Cadbury Chocolates made in Bourneville, UK are a favorite around the world. You can read about their products at this site. If you have time, read about the history of their company. The early Cadbury company was revolutionary in caring for its employees. To this day, the whole town of Bourneville smells of the chocolate factory there. Yum!
http://www.cadbury.co.uk/cadburyandchocolate/Pages/cadburyandchocolate.aspx


Categories

props (35) fakery (31) faux (25) food (25) fakefoodfriday (24) theater (24) Fake Food Friday (22) cake (10) foam (9) kitchen (9) caulk (7) Albert Herring (6) casting (6) insulation foam (6) opera (6) Design Master (5) Smooth-On (5) booze (5) desserts (5) drink (5) edible (5) jaxsan (5) microfoam (5) molding (5) acrylic (4) carve (4) ham (4) resin (4) acrylic caulk (3) beverage (3) candy (3) cheese (3) cocktail (3) dressing (3) fruit (3) latex (3) model magic (3) period (3) upholstery foam (3) urethane (3) vintage (3) Helena Mestenhauser (2) Ilana Kirschbaum (2) Sarah Heck (2) acrylic paint (2) appetizers (2) brownie (2) casserole (2) chocolate (2) confection (2) decorating (2) dial (2) ephemera (2) fish (2) flower (2) foam sheet (2) gel wax (2) hot pour vinyl (2) leg (2) link (2) mocktail (2) mother mold (2) pies (2) pizza (2) reference (2) research (2) safe (2) salt dough (2) sandwiches (2) tutorial (2) wrappers (2) Canapes (1) David Russell (1) Dowel (1) Dragonskin (1) Ellie Bye (1) FX (1) Flex Foam-It (1) Fritos (1) Introduction (1) JT Ringer (1) Jess Smith (1) Keli Sequoia (1) Materials Monday (1) Oona Tibbetts (1) Poultry (1) Sara Pool (1) Serena Yau (1) Skylight (1) Smoothcast 325 (1) Turkey (1) Victoria Ross (1) Wonderflex (1) Worbla (1) alcohol (1) alginate (1) apoxie (1) aspic (1) banana (1) bead foam (1) bread (1) bundt (1) cabbage (1) carnation (1) cellophane (1) champagne (1) cheesecake (1) cherries (1) chilaquiles (1) citrus (1) clear (1) coat (1) coke (1) cola (1) contact adhesive (1) cork (1) cotton batting (1) cream (1) drinks (1) dumplings (1) fake steam (1) faux mex (1) flexcoat (1) fondant (1) fruit salad (1) glass (1) great stuff (1) gum paste (1) hands (1) herring (1) hors D'ouevres (1) icing (1) intern (1) joke (1) katie webster (1) kolache (1) labels (1) lettuce (1) life casting (1) liquid (1) martinis (1) marzipan (1) meat pie (1) menu (1) mini fogger (1) mini mister (1) nougat (1) olive (1) olives (1) oranges (1) pan dulce (1) paraffin (1) pastries (1) pastry (1) peas (1) petit fours (1) pickled herring (1) pie (1) pie crust (1) pineapple (1) prosciutto (1) punch (1) restaurant (1) samosas (1) sculpey (1) shrimp (1) small pastries (1) snacks (1) soda (1) sorbet (1) spilled (1) stage effects (1) sugarplums (1) sweetmeats (1) sweets (1) taco (1) tomato (1) tuna (1) tv dinner (1) vacuform plastic (1) violets (1) wax (1) welcome (1)