No #fakefoodfriday today, as it's OPENING NIIIIIIGHT!
Finally, the culmination of many 12 hour days, late night techs, and serious shift rehearsals have gotten us here. In the grand tradition of the Santa Fe Opera Prop Shop, we will have a big party/ Prop Tart Queen Coronation and then open a show tonight (La Boheme) and another tomorrow (The Pearl Fishers) and then (hopefully) rest on Sunday.
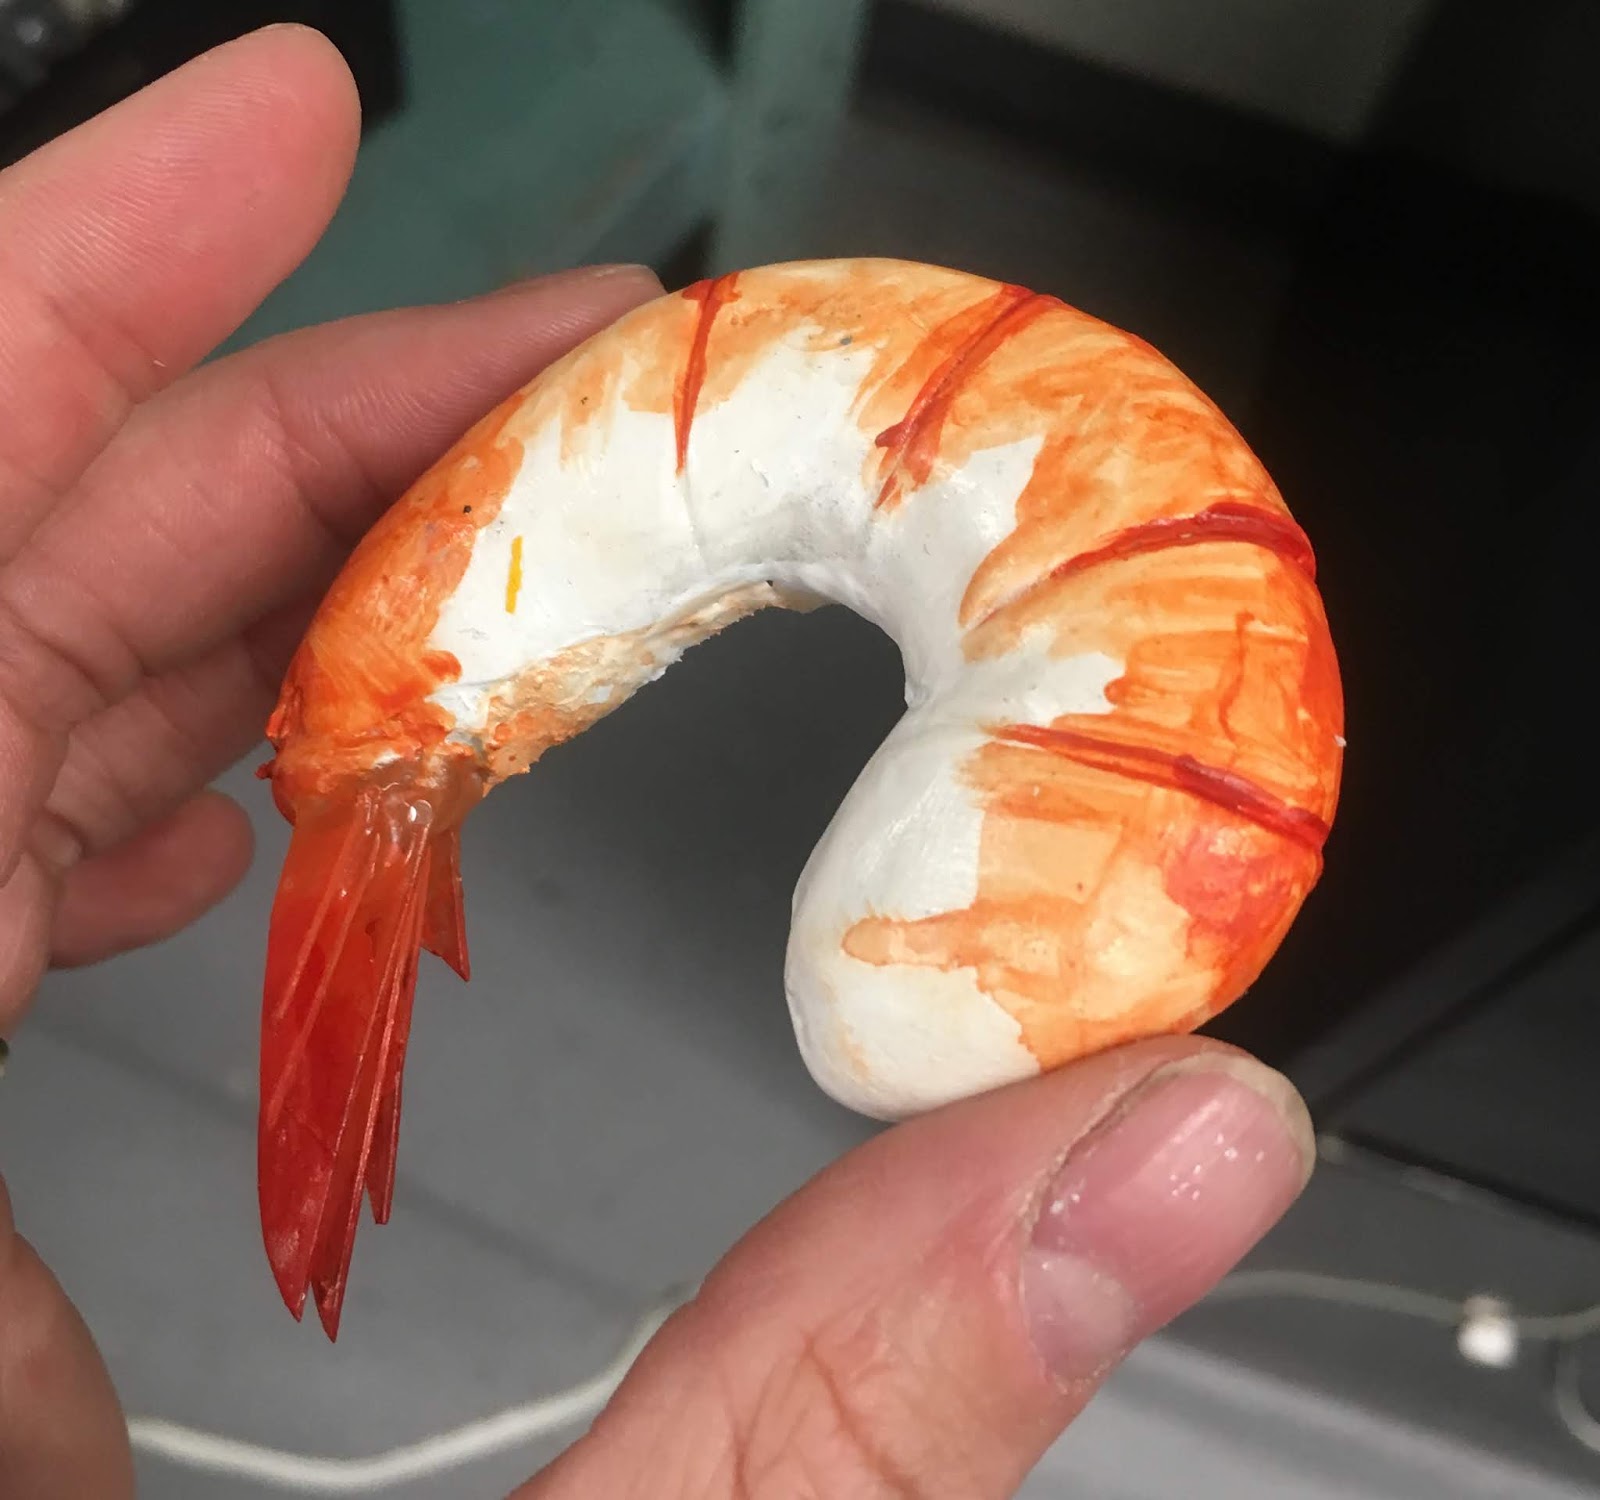
This week's post is a little different, as I asked the lovely Sara Pool to send me the pictures for these delightful shrimp, but I'm going to write the process up, because I witnessed the magic FIRST HAND, as she and I work at ye olde Opera together. We are also currently co-craft heads on La Boheme, and that's what these shramps are from! (Yes, I did say shramps. You can thank our lovely founder Anna for planting that one in my head years ago, and there it remains. SHRAMPS!) Onto the crafting!
Materials: Insulation foam, Crayola Model Magic, scrap vacuform plastic, acrylic paint, hot glue Tools: Olfa knife, sandpaper, scissors, cheese knife, clay tools These shrimps started out as many food projects do, with the general shape cut from insulation foam.
However, we only had 1 inch foam, which was a bit too hefty for our shrimps, so Sara cut them all in half.
Then there was some sanding
So shrimpy
For the tail, Sara cut some scrap vacuform plastic into tail shards (shards seems like such a harsh word, but I can't think of anything better?)
Those pieces were then glued into the tail of the shrimp body with our good friend hot glue
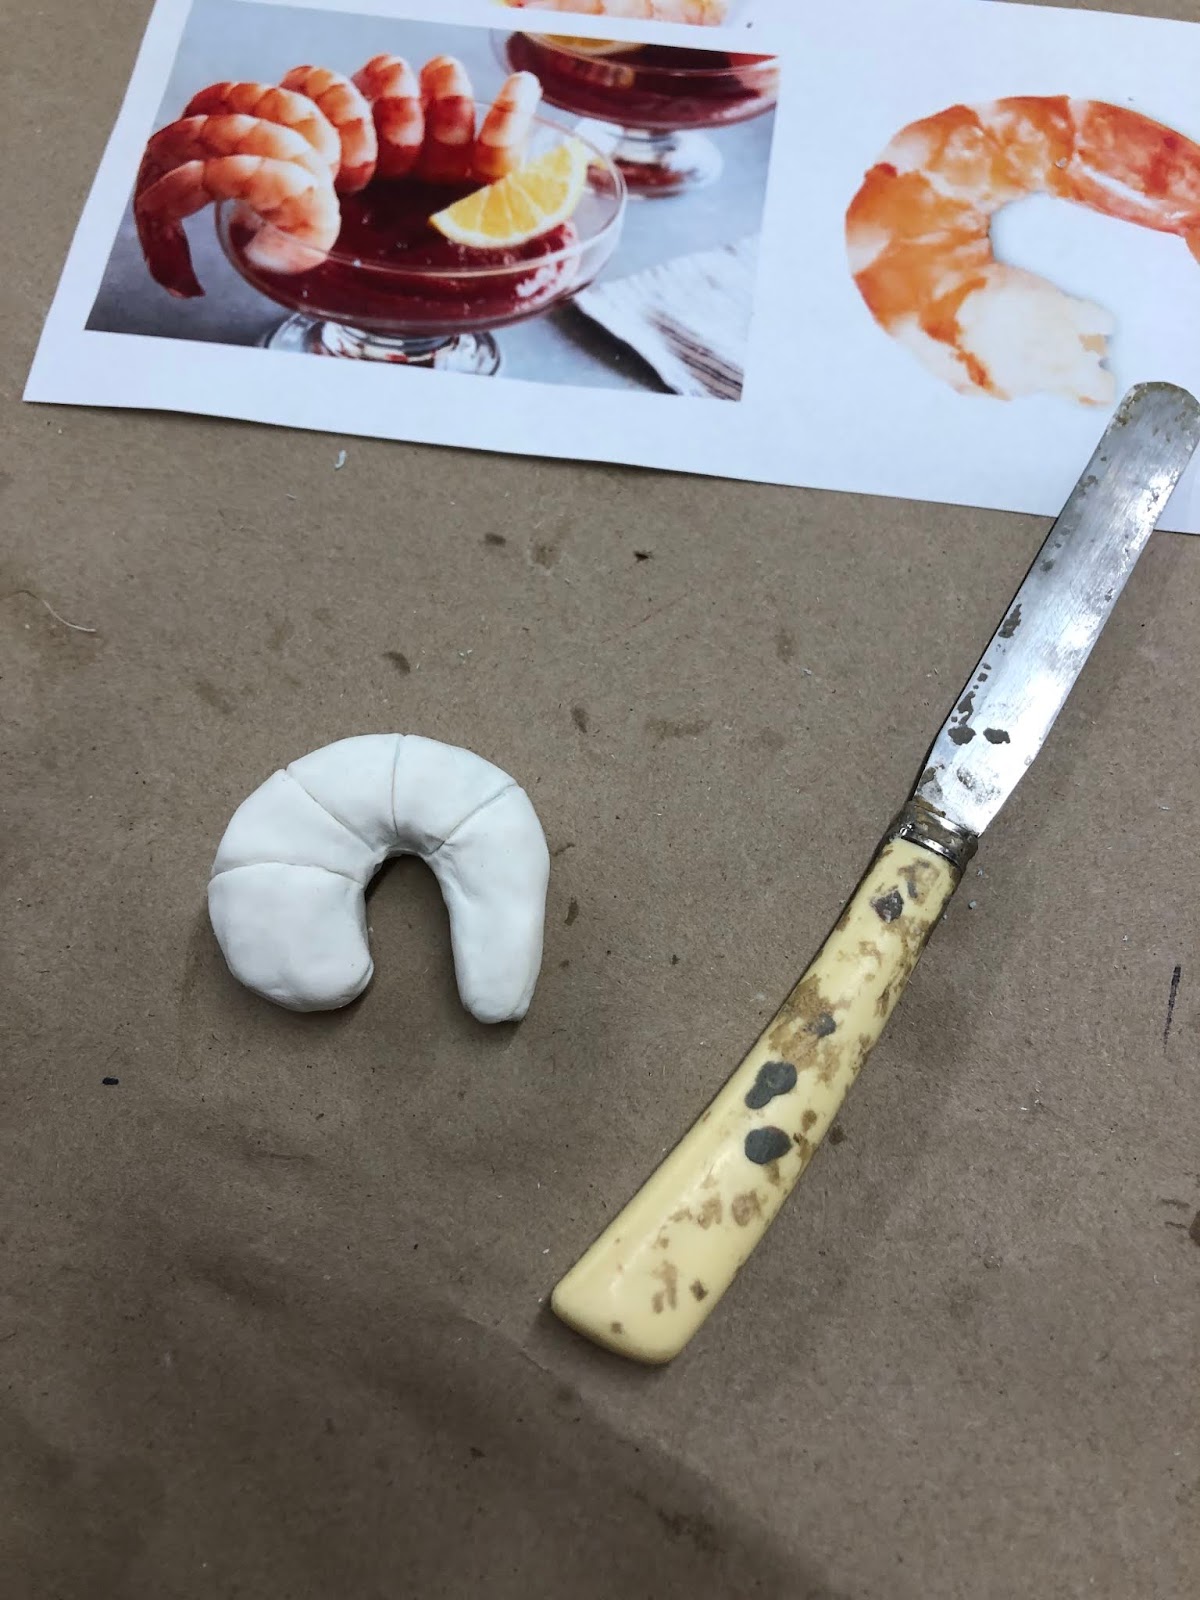
To give the body some more dimension, the foam bodies got some Model Magic detailing
(I had suggested trying some fun foam for the shell, but that was a BAD IDEA and the poor shrimp looked like a tiny croissant)
Some artful indents gave the illusion of the shell segments really well! To achieve this, Sara used a combination of some clay tools, and also a dull cheese knife (honestly, I can only assume this was a cheese knife... it's been in our carving tools since before I started)
This was a segment trial, before the tail was added!
At this point, during a break, Sara made the astute observation that her toes and the shrimp were quite similar
#summerstockobservations
Then the shrimps were sent off to one of our very talented painters, Serena Yau, who brought them TO LIFE. Well, to beheaded, steamed, and put on ice life...
Trash Rat Approved!
Eventually these shrimp ended up on a tiered seafood tray (as previewed in the shrimp to pic) surrounded by fake ice. So good!! Boheme opens in one week from today and I can't wait to see these on stage!
You can see more of Sara's work here and Serena's work here. Happy Fake Food Friday, and Prop On!
Hello all, it's that time again for a guest post! This time we have a tutorial on Margherita Pizza from Hannah Fenske, who I worked with at the Opera. This delish dish (yeah, I said it) was for 2018's The Italian Girl in Algiers at the Santa Fe Opera. Take it away, Hannah!
Aimee shared a great tutorial last month for her version of leftover pizza, but there’s no single way to make a pizza! I was tasked with making one last summer, and used some different techniques to accomplish a similar product. It was requested as a rehearsal stand-in for what would eventually be a practical margherita pizza consumed onstage in a very silly scene. This meant that it didn’t need to be anything fancy, but the desire to make something pretty combined with a quiet work week allowed me to go all out on this project!
Materials: Thin upholstery foam, hot glue, Jaxsan, papier mache, Flex Glue, fake ficus leaves, acrylic paint, gloss sealer (also, round plastic tray and pop rivets)
Tools: Heat gun, scissors, hot glue gun, sandpaper, Olfa knife, paintbrushes (also, pop rivet gun)
First, I started off with a thin piece of upholstery foam (1/2” or so) and cut it into a rough circle. I wanted the final product to have some flexibility to it to mimic real slices of pizza, but in retrospect, after I added the layers of hot glue and Jaxsan, the pieces ended up fairly stiff. While the foam worked really well aesthetically, I would probably recommend using some craft foam as a base instead if you want a more flexible end product.
For my particular pizza, since I knew it would be carried around stage and tipped towards the audience, I needed to keep the slices on the tray and together until they were removed for “eating”. I accomplished this by adding some pop rivets to the tray and keeping the corresponding hole in each slice marked and clear throughout the process. You can see my Sharpie marks in the next picture.
From there, I cut some additional pieces of the same foam to build up the edges for a thick crust look. I made sure to vary them in width and placement since real pizza crust isn’t perfectly consistent. Then, since papier mache doesn’t really like sticking to upholstery foam, I painted a layer of Jaxsan onto the crust and let it dry before adding a few layers of good ol’ papier mache. This gave the crust a nice lumpy look and feel while still being smooth enough to look like crust. After a bit of sanding, I also ended up adding a layer of Flex Glue to the crust for added stability and to smooth out any rough spots.
Next, tomato sauce! I added liberal amounts of hot glue to the center of the pizza, making sure to overlap the edges of the papier mache to keep them from curling up. Once a section was covered with a puddle of glue, I would wait for it to partially set up, then go back and use the tip of the gun to add texture by re-melting the glue in places. I considered using a more sophisticated material like silicone for this, but I liked the malleability of hot glue since I added lots of texture with this step (also, hot glue is way easier to paint!). Once the layer of tomato sauce was built up and cooled, I added a few specific smooth puddles of glue that would become the melted slices of fresh mozzarella. (Sidenote: If you’ve never had a slice of classic Italian-style margherita pizza with the fresh mozzarella slices, you’re missing out! It is by FAR my favorite kind of pizza. Go try it.)
Basil came next. I acquired some leaves from a silk ficus tree, and since basil shrinks and gets sort of wrinkly when it’s cooked, I took a heat gun to them. Worked like a charm! I also pressed them flat while they were still warm since they were initially a bit too voluminous to be convincing.
The next steps were a lot of careful layers of paint. I based the whole thing in a pizza dough beige, then added a variety of browns to darken the crust, focusing on darkening the places where the dough “bubbled”. I used two or three reds for the sauce, and after painting the cheese white, I added some yellow in the low spots where the oil would have pooled. I painted the basil a darker green, glued it on, and added bits of even darker green and brown to the cooked edges. To seal it, I added a layer of gloss to all of the sauce, cheese, and basil.
Also, once I realized that my pizza wasn’t going to be particularly flexible, I went ahead and added a layer of Jaxsan to the bottom (not pictured, sorry). This gave it a nice crumbly feel, and with some paint, it blended in well to the edge crust.
As much as I didn’t want to cut up my lovely pizza, it did need to be sliced. I made the cuts with an Olfa knife, then painted the sides of the slices strategically with the beige, reds, and whites. The edges didn’t end up looking as finished as they could have with some additional papier mache and/or Flex Glue, but I wanted to make sure that the pieces fit together as snugly as possible.
And here you have the end result! Don’t you love when a fun project goes even better than you expected? I tend to get the wiggles when I’m in a good place creatively, and there were lots of those during this project.
Wishing you happy crafting and creative wiggles of your own. Prop on!
For one of our operas this season (La Boheme!) we have a scene set in 1830-40s with a lot of vendors. One very delightful item we needed to make was some nougat! Our Instagram followers have had a preview of this one, as I've been sharing some process shots over there.
Materials: Crayola Model Magic, Acrylic paint, iridescent gift wrap, transparent tape, Joe's Sticky Stuff, Stock silver platter
Tools: Knife, ruler, Olfa blade, scissors
I haven't written a Materials Monday post about Crayola Model Magic yet, but I did write some about it in the Marzipan Hedgehogs post, and it really is one of my favorite fake food materials. And it is the perfect texture for nougat! Originally I was going to add some plastic orchid buds (you can see them in the background of the photo below) to be my pistachios, the color and shape were perfect. However it was pointed out that if all of the mix-ins were the same density (or material) that cutting would be immensely easier.
A warning on this one: this project took a LOT of patience due to dry times. Even working in a literal desert, it still took daaaays. Nearly 2 weeks passed between first sculpting and final wrapping. Model Magic is air dry only, and I've not attempted drying it in any other manner. I did contemplate trying a toaster oven (non-food use only, of course), but I didn't want anything to burn...
Day 1: I started with white Model Magic and some acrylic paint for almonds. I rolled them into balls and generic almond shapes.
I then repeated the process for pistachios. I wasn't terribly concerned about how they were going to look, as they were going to get mixed into the nougat, then cut.
I then let them dry out in the sun for a few hours. They got a nice 'skin' on them, and to help them along (and make them easier to mix), I cut them in half.
Dry little nut babies! Dryyyyyy!
Next, I made some dried cherries. To get enough color, again starting with white Model Magic, I had to add A LOT of paint. From experience, I knew this was going to make it quite sticky, but I only had the white MM to use. If I did it again, I would have started with a base red so I wouldn't have to add so much paint. Once I had the color I wanted, I rolled the MM into snakes and picked off odd sizes to look like cut cherries. Like the nuts, I wasn't super concerned about how they looked pre-mix.
After making the little cherry chunks, I set the cherries and nuts out to dry in the sun yet again. I left them out for the rest of the day and worked on other projects.
Please enjoy our desert setting, sand and rocks and a retaining wall.
Day 2: I set out to make the nougat out of even more Model Magic!
I got a bit too excited about my off-white nougat base, and added too much paint. I added more MM, which worked out well in the end, even though the color was definitely darker than I had hoped, and very close to the almond color.
I will fully admit that I've been watching a lot of the Great British Baking Show, and I was certainly treating this like a bread dough. There was a lot of kneading involved (hence the slap-dash waxed paper taped to my table). I flattened it out to add my nuts and cherries in!
And then so much mixing commenced!
I ended up cutting some of the pistachios into quarters for better mixing. Model Magic is easy to work with, but mixing a beast this big was very tiring...
I mixed nearly all of my nuts and cherries into the mass, but it was pretty arbitrary. I then smushed it all into a baking pan I found in stock!
So nougatyyy
In hindsight, I probably should have put some sort of release agent on the pan, but it was non-stick and I thought it would be fine. And now, the waiting began... I knew it was going to take a while for the mass to dry, so I set it outside to take advantage of the dry air and sun. However, I was leaving a real baking pan with an irresistibly pokeable material in it, out in a path where people would be walking past. And after 9 years of working here, I know how my curious co-workers would react. After an entire day of sitting outside, the nougat was still pretty soft. I was hoping that by the next day, it would be pretty dry!
Day 3: My hopes were dashed. I let it sit in its pan for another day, to let it firm up.
Day 4: By the end of the day, the nougat was somewhat dry, and I felt confident enough to peel it out of the pan. And let me tell you, it was still quite wet and squishy on the underside. Fortunately it was Saturday, so I was able to let it sit out for an entire day without me or anyone else wanting to poke or cut it open.
Day 5: A day of rest for me and the nougat.
Day 6: Still not dry.
Day 7: IT'S FINALLY TIME.
I got a sharp-ish knife that we have for foam carving, and marked some generic cut lines. Thanks to my co-worker Sara, we captured the first cut!
THE REVEAL!
This also unofficially launches the F-n-B youtube channel, I guess. I'm v glad my nails aren't filthy, but it's also very weird to see your hands from a different angle than from your body... I digress.
If you don't want to watch the vid, the cuts were pretty successful! After cutting them into squares, I let them dry yet another day. I was very glad that I opted to make everything from Model Magic, as cutting tiny plastic chunks probably would have made this process much more difficult, and it's possible the MM wouldn't have stuck to the plastic and the nuts would have fallen out.
Day 8: Stacks! The red from the cherries did streak a bit, and the almonds are basically invisible, but I'm pretty pleased with how they turned out!
I found the silver tray in stock, and ended up making a white foam tower on the inside to hold up the pyramid and get the most out of the nougat chunks. I ended up trimming several of the edge pieces to get a square cut. And, because the scene they're going to be in is very shiny and sparkly, I wrapped the days-dried (we're talking Day 12 at this point), in iridescent cellophane because it's FESTIVE.
In the days since, the tray has been cut, but the nougat remains (so far). I hope you've enjoyed this very long tutorial. It's still not as time consuming as actually making it, but it looks real enough to eat, I think! (Note: Our shopper found some real nougat at Trader Joe's and bought some for the shop. It was not what I was expecting, but I also didn't hate it. The best way I could describe it is wet marshmallow, but also tasty? I'd eat it again.)